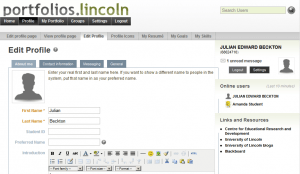
Ok, as promised here’s the first post on how to use the Portfolios.Lincoln tool. The first thing you need to do is to complete your profile, because this is where you store most of the information about yourself that you will need to create views of your portfolio. It’s also a good opportunity to get familiar with the layout of the tool.
Go to http://portfolios.lincoln.ac.uk
Log in with your university username and password. This will take you to the Portfolio main menu

Click the “Profile” button on the Menu Bar.
This will open your profile. Your name will have been entered by the system. (Although you can change it.). You can also enter your student ID number, a preferred name, and write a short introduction about yourself.

You can also upload a picture of yourself by clicking on the silhouette on the left of the screen. In fact, you can store up to five pictures of yourself, which you can use in different views of your portfolio. Note that your images must be no bigger than 1024 x 1024 pixels in size and no smaller than 16x 16 pixels. You can resize images in many common photo editors such as Paint Shop Pro, or Photoshop.
When you have finished click the Save profile button. Now click the “Contact Information” tab. This is where you put in details of how people can contact you. Nobody however, will see this unless you choose to make it visible in a “view” (There’ll be more about views in a future post.). Fill in as much as you can, (or as much as you want to) and click “Save profile”.
Next you can enter your messaging contacts (if you use these services – if not, don’t worry, you don’t have to fill in any of this.)
Finally there’s a tab entitled general which just has two fields, in which you can list your occupation and the industry in which you work.
That’s the basic profile information set up. However there’s much more to the profile than that so before we leave, let’s have a quick look at the layout of the screen, and specifically at the second of the three menu bars. I’ll explore this in more detail in future posts but here’s a brief run down of the function of each option.

Editing the profile page.
This is where you create your own personal overview of your portfolio. You can list all your views and friends and add any other information to the overview. You can also decide whether you want to make this overview available to friends or to the general public.
Viewing the profile page.
This is simply the page you created with the editing tool above. It’s basically the home page of your e-portfolio.
Edit profile
Enter basic information about yourself. (See above)
Profile Icons
Upload up to five profile icons (pictures of yourself, or perhaps avatars)
My Resume
This is where you complete your CV. This is one of the most important sections of the profile, because you can use different parts of your resume to populate different views of your portfolio.
My Goals
You can enter your academic personal and career goals here. (and again, use them in different views of your portfolio)
My Skills.
You can enter descriptions of your personal, academic and work skills here. (and again, use them in different views of your portfolio)
I’ll discuss Resume building in the next post. For now, if you have any questions, please feel free to add a comment.
[…] Walks ← Portfolios.Lincoln: Setting up your profile […]